Photo Captions With Nintex Mobile Forms
Many companies across multiple sectors have information gathering requirements that involve sending workers to gather data in remote sites. Using Nintex Mobile Forms we can construct and end to end solution that supports online/offline report generation that can be instantaneously submitted from mobile devices (tablets, phones) into SharePoint triggering a review process by Project Management. This closes the information loop by dramatically cutting down the time between inspection and data delivery and can allow Project Managers to request additional info gathering or issue new instructions within minutes. A minor error, taking minutes to fix, can become a costly project roadblock if it's now buried in 8 feet of drying concrete.
A Photo Is Not Always Worth A Thousand Words
If the site report requires photo documentation however we may have problem. Sure, if we are only going to take one photo, then we could add a field in the form called Photo Caption and be done with it, but Nintex Mobile forms submit to SharePoint lists and we can have unlimited numbers of attachments. Titles like IMG_22201, IMG_22202, IMG_22203 aren't exactly useful descriptors. Ideally we want a solution that allows captions for any number of photos. Let's see how we can solve this using a second application and SharePoint's built in extraction of image metadata.
First, get any application that allows you to modify EXIF data on your mobile platform. For iOS there are a number of options but I've used EXIF-fi for this demo. It's an iPhone only app so you will need to modify your search to download it if you're using an iPad. I like it, though, because unlike some other editing applications which give you a giant table of all the image's attributes, it's intelligently laid out to answer the two use cases of interest to a remote working in the minimal amount of time. I can:
- Easily edit the description of the photo
- Visually confirm that the coordinate data in my photo is included and correct. Important if you're extracting the GeoLocation information for mapping within SharePoint.
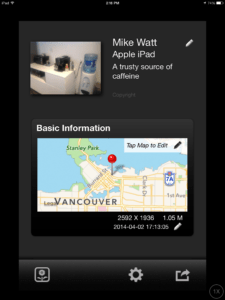
Office coffee maker: location confirmed!
Having added a description and photographer name (optional) I save the picture, go back into Nintex Mobile, attach it to my form along with any number of other edited images. These will get submitted into my SharePoint list immediately or whenever I'm back in signal range. So now I have a list item with attachments.

From here, each photo attachment gets copied over to an asset library and the value I entered as the Description in EXIF-fi is now the title of the image. Nice! Sharepoint photo libraries have generic fields like Description and Copyright and will automatically extract this information from the image. We're not limited to this and there are a number of additional fields that can mine additional EXIF attributes on upload including GPS data (Expand the picture to see the location fields including wic_System_GPS_Latitude and wic_System_GPS_Longitude). I'll be writing a blog post on mapping photos in SharePoint using ESRI or Bing in the future but if you want to read the list of supported WIC (Windows Imaging Component) fields see Michael Panciroli's article on the subject.

So how does this happen? Well, in our first list, we use a Nintex workflow to copy the list attachments to the photo library. The same workflow handles the Record ID generation but that's outside the scope of this post. Here's what the copy portion of the workflow looks like:
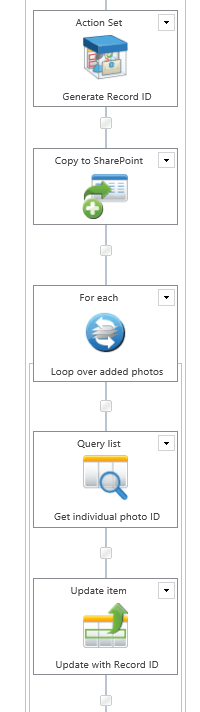
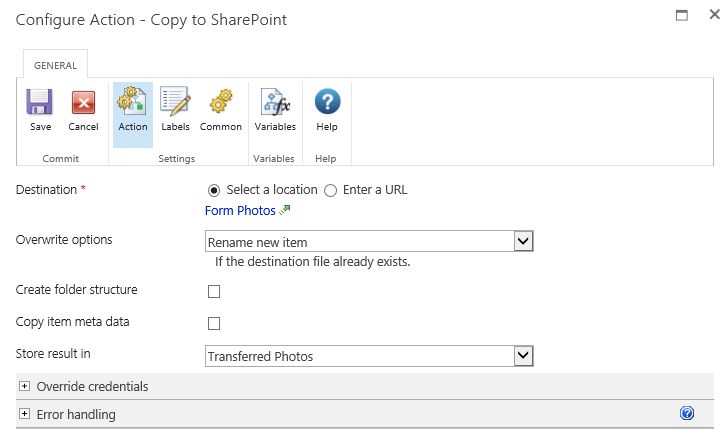
Step one, Copy to Sharepoint. This action copies all attachments to a target library. Two things to note. We specifically do not check the option Copy Item meta data . Normally this is the simplest way of transferring metadata on the parent list record to the copied attachments but here we have a specific problem. Sharepoint will automatically create the title for us with the EXIF description, but not if we tell Nintex to copy the metadata. In that case Nintex will append the title of the list item itself. Not helpful if each of our photos has a separate description caption. Disabling this gets around that issue but gives us another problem. Now we have to associate the photos to our list item metadata (Record ID, etc) in another manner. We create a new collection variable called Transferred Photos and attach that to the Store result in option.
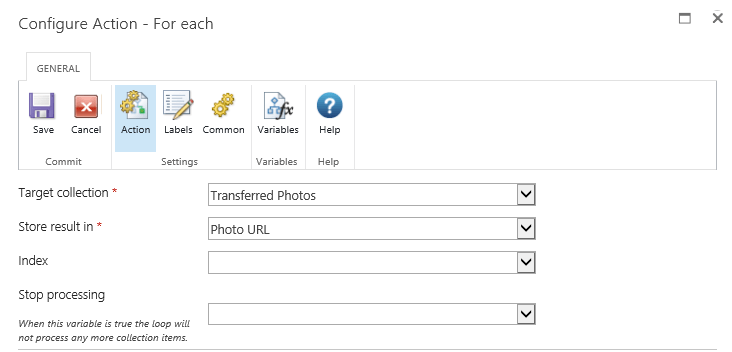
The results stored in the collection are the URL of each file uploaded. So, we use a For Each action. Target the Transferred Photos collection and create a new single line of text variable called Photo URL. Store the collection result there.
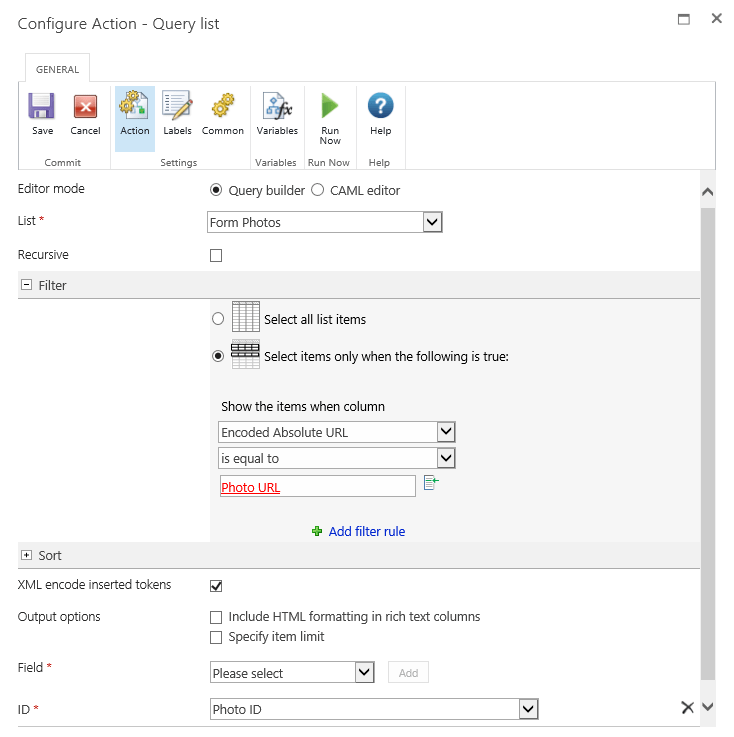
Once you've got your URL and you're inside the loop, use a Query List action to get the specific record. Use the filter displayed below and create a new number variable called Photo ID to store the query result. Once you have this, it's only a matter of an Update Item action to append any associated metadata you want to the copied items.
And done! From here we can do all sorts of additional processing. We might, for example, decide to trigger an approval of the report. If the PM decides that there needs to be additional data gathering they could assign a task back to the remote worker which would immediately appear in Nintex Mobile on their tablet.
There are two limitations to this process that I hope the Nintex Mobile product team solves in the near future. First, though the Mobile client does include an integrated camera option, photos taken within the app do not get GPS data though they do get other EXIF attributes populated. This happens even when both the Camera and Nintex Mobile apps are enabled for location services. So for now, these photos need to be taken in the native Camera app. [Vahid from Nintex has just let me know that this will be resolved in the near future ( see comments)] Also, it would be great to also see the option of changing the basic photo attributes (Description, Author, Copyright) within the camera interface in Mobile. Going through EXIF-fi or another similar app is a workable solution but it would be cleaner if the user didn't need to bounce between several different apps.

It’s Time To Transform
Let us show you how much easier your work life can be with Bonzai Intranet on your team.